
Connecting Claude, Copilot, Cursor, and Open WebUI
Concrete client config examples plus the OAuth login flow
Once Bifrost’s MCP server is enabled (see Server Setup), any MCP-compliant client can connect. This page walks through Claude Desktop, GitHub Copilot, Cursor, and Open WebUI.
The general flow is the same for all of them:
- Tell the client the MCP server URL (
https://your-instance/mcp). - The client kicks off OAuth: it registers via
/register, redirects you to Bifrost’s login, and exchanges the code for a token. - The client receives Bifrost’s four gateway tools. Those tools discover only the agents and capabilities your roles allow.
Claude Desktop
Section titled “Claude Desktop”-
Open Claude Desktop’s settings file:
- macOS:
~/Library/Application Support/Claude/claude_desktop_config.json - Windows:
%APPDATA%\Claude\claude_desktop_config.json
- macOS:
-
Add a
mcpServersentry pointing at Bifrost. Claude Desktop uses the streamable HTTP transport for hosted MCP servers:{"mcpServers": {"bifrost": {"url": "https://your-instance.com/mcp"}}} -
Restart Claude Desktop. The first time you mention a Bifrost tool, Claude opens the OAuth flow in your browser.
-
Sign in to Bifrost. Claude receives the access token and your tools appear in the tool tray.
GitHub Copilot
Section titled “GitHub Copilot”-
In VS Code, open Settings (JSON) and add an
mcp.serversentry:{"mcp.servers": {"bifrost": {"url": "https://your-instance.com/mcp"}}} -
Reload VS Code. Open the Copilot Chat panel and type
@bifrost— Copilot prompts you to authorize. -
Click Sign in and complete the Bifrost login. Tool calls now flow through Copilot Chat.
Cursor
Section titled “Cursor”-
Open Cursor’s settings (
Cmd/Ctrl + ,) and search for MCP. -
Add a server entry:
{"mcpServers": {"bifrost": {"url": "https://your-instance.com/mcp"}}} -
Restart Cursor. The first tool call triggers the OAuth login in your browser.
Open WebUI
Section titled “Open WebUI”-
In Open WebUI, go to Admin Settings → External Tools → MCP.
-
Click Add MCP Server and enter the Bifrost URL (
https://your-instance.com/mcp). Open WebUI auto-discovers the OAuth endpoints. -
Click Authorize, complete the Bifrost login, and approve the tool list. Tools now appear under the model’s tool tray.
Use the in-product connection menu
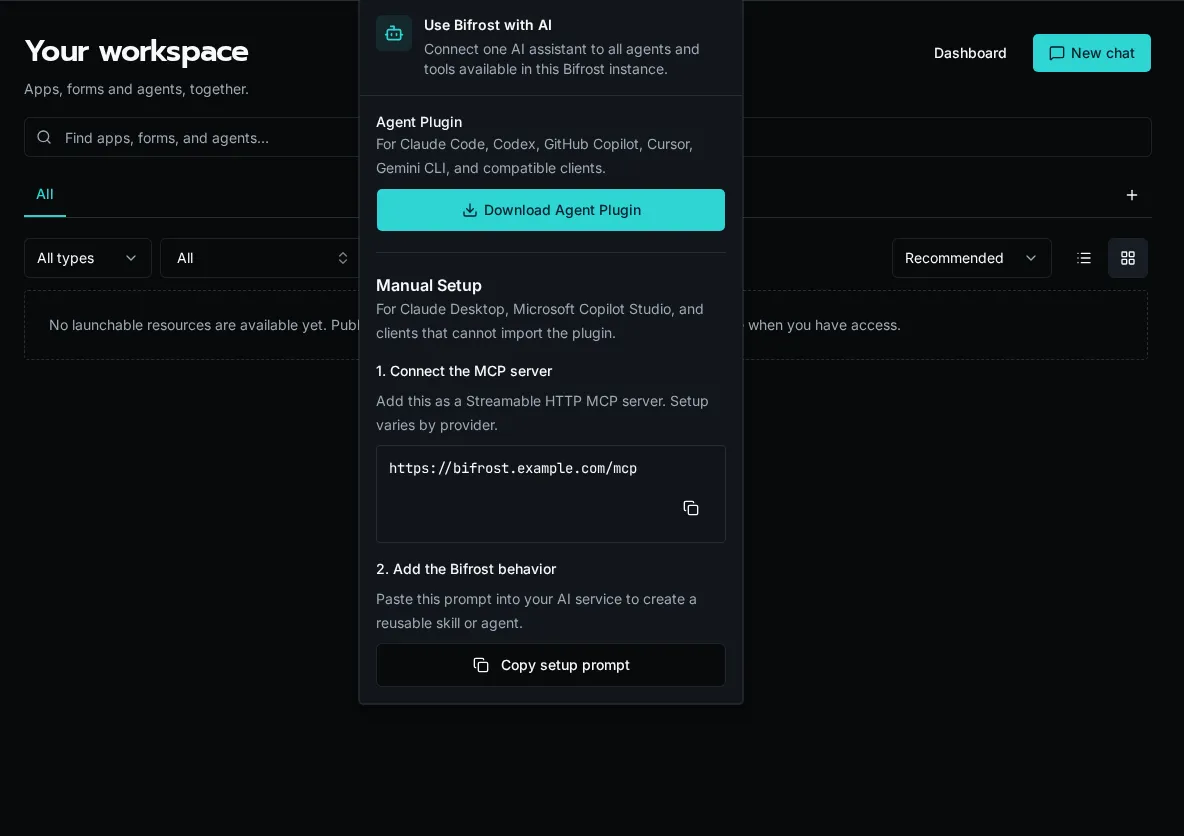
Section titled “Use the in-product connection menu”When MCP is enabled, select the robot icon in the Bifrost header. The Use Bifrost with AI menu offers two paths:
- Download Agent Plugin for Claude Code, Codex, GitHub Copilot, Cursor, Gemini CLI, and compatible clients that can import an Agent Skill package.
- Manual Setup for clients such as Claude Desktop or Microsoft Copilot Studio. Copy the instance MCP URL, then copy the supplied behavior prompt into the client.
What tools become available
Section titled “What tools become available”At the root /mcp URL, every client receives the same four tools: bifrost_find_agents, bifrost_get_agent, bifrost_get_tool_schema, and bifrost_execute_tool. The gateway uses the following controls when it discovers agents or dispatches a tool:
- The Allowed / Blocked Tools lists in Settings → MCP.
- Your user’s roles (the
rolesclaim on the JWT). - Which agents have your roles in their access list.
- Each accessible agent’s workflow tools and
system_toolsconfiguration.
The connected client’s “list tools” command shows the four gateway tools. Use bifrost_find_agents and bifrost_get_agent to inspect the live, permission-filtered catalog. If you connect directly to /mcp/{agent_id}, the client’s tool list instead contains that agent’s native tools.
Troubleshooting
Section titled “Troubleshooting”| Symptom | Likely cause |
|---|---|
| OAuth flow opens but never returns | Client redirect URI doesn’t match. Re-register the client (delete and re-add the server). |
| 401 on every request | Bifrost MCP toggle is off. Re-enable in Settings → MCP. |
| Agent search returns no matches | User has no access to a relevant agent. Check the agent’s access level and role assignments. |
| Cross-origin error in browser-based client | Verify the discovery endpoints serve Access-Control-Allow-Origin: *. |